I was about to launch my first product from an overseas factory. The product design was done, the product prototypes given the all clear and manufacture was in full swing. Then the factory asked “What packaging do you want to put it in”. I had been so wrapped up in the actual product, I hadn’t even thought about the packaging. I knew what I didn’t want and that was some "off the shelf" packaging. That’s when I realised that for me, product packaging design shouldn’t ever be an afterthought.
With that first product, the easy option would have been to put it in a plastic bag, add a header card to it and away we go. So many products on the market are packaged just like this (especially in our industry) and it’s fine. I just REALLY didn’t want that and for some reason it didn’t sit very well with me. So I put pen to paper and away I went...
It was an all over the place type process the first time. I was looking at packaging in stores, looking at what else was in the industry and Googling “best packaging design, innovative packaging design etc” and coming up with not much.
Most of what I saw was either products in a plastic bag, or products put into a pretty standard off the shelf type box. Googling “product packaging design” only really came up with designs that focused on the graphic design work and not the actual box construction design, which is what I was really looking for. It looked like it was going to be up to me.
After countless hours of drawing, making, scraping and reworking I finally came up with something I was happy with. Although it looked a bit ridiculous, I knew what it would finally turn into.


What you can’t see from those pictures is the 2am packaging design sessions, with chopped up cardboard everywhere. So many of the packaging designs going to scrap when it didn’t quite sit right, or it distorted the product in the packaging, or I thought it was perfect only to find didn’t fit in the correct postage satchel…
The great thing about going through the packaging design process from the ground up, is that I can now create unique and innovative packaging designs quickly and have our products rolling out of the factory fully packaged and presented, ready to look great on display in store or landing on a customer’s door step.
I’d like to share with you a bit of our product packaging design process, to hopefully save you from some of the mistakes that I made when I was starting out.
Firstly a quick caveat. I have never had any formal packaging design training, although thousands of products have rolled out of factories wrapped in my packaging. So I’m sure this packaging design process will work for you too.
WAIT! Before you go 100mph into drawing, cutting and pasting and looking like a prep school art class, it’s a good idea to idea to brainstorm your product packaging criteria. The good news is that this will most likely not change for future/multiple products.

The key criteria I work to is:
- Cardboard only (to allow for fully recycled packaging)
- Hold the product securely
- Allow in-store customers to be tactile (without opening boxes)
- Balanced hang position
- Clear brand recognition (logo sizing etc)
- Space for instructions on reverse
- Fit in relevant postage satchel (economical for our retailers to ship)
- On brand with current range
With your key criteria in mind, I’d recommend a workflow that goes through:
- Idea (don’t get too fixated on one, it will evolve multiple times during the process)
- Notebook sketches. Hold the product in your hand and think of how a customer would best view it for the first time. And then how will your product packaging hold and display it in that way (reorienting your product in your hands will help).
- Product packaging model. Once you’ve drawn a packaging design you think will work, accurately model it on card keeping in mind dimensions. Too big a packaging takes up too much in store real estate and is harder for shipping. Too small a packaging may deform the product or just not display it properly. Remember to refer to your key criteria, during this part of prototyping your product packaging.
You may want to take step 3 to your design software (Adobe Illustrator etc) and print it. I choose to do this part of the packaging design physically, as it allows me to change and iterate very quickly.
- Digital design. Once you’ve gone through multiple product packaging models, it’s time to take it to Illustrator. If you’ve not got Adobe Illustrator, you can always download Inkscape for free. Inkscape is a very powerful vector based software, that I used for years before turning to the dark side. Remember to differentiate between the fold lines and the cut lines on your packaging design. Ideally your cut lines are on one layer and your fold lines are on another layer.
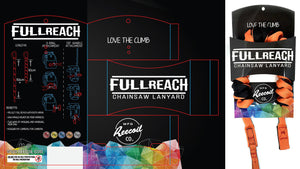
On the picture below: Red line = Cut, Blue line = Fold

- Test print. Now comes the really satisfying part. Run a test print with just a few of your product packaging designs. Remember the weight of card can make a big difference in the support and look of your packaging. If you need your packaging to support your product while hanging in store, test it in that way. Look over the whole packaging referring to your key criteria. Does it meet all the needs? Remember that if not, that’s great. It’s much better to know now, than when your products have landed complete in their packaging… but it doesn’t work.
- Set it free! Now that all that hard work’s been done and you’ve got a product packaging design to be proud of. All that’s left is to email it off to your factory, ready for your products to be assembled and land with you in their great looking packaging.
Keep your fingers crossed though… there may be a typo ;)
If you've got any questions and are in the design process yourself, please feel free to get in touch. I'm always happy to help. Thanks, Dan.


