This week we’ve decided to discuss ten of the best friction hitches that every climber should know. There always seem to be new ones coming out and it can be hard to keep up to date with it all. That isn’t to say that there aren’t still some classics out there that have stood the test of time but not to worry - I’ve collated a representative selection for you all to take a look at.
A FEW POINTS BEFORE WE GET STUCK IN
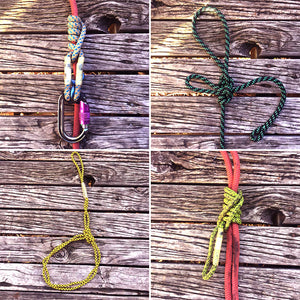
1. I’ve decided to use an 800 mm [eye to eye] length of 10 mm hitch cord [Yale Bee-line Blue] on an 11.7 mm rope [Yale Scandere Code Red]. Hitch performance and characteristics are VERY dependent on the relationship between the chosen hitch cordage & rope - there are innumerable options so just experiment and find one that works for you.
2. A hitch that works well for DdRT [Dynamic doubled Rope Technique] may behave surprisingly differently when paired with a Rope Wrench for SRT [Stationary Rope Technique]. It’s not immediately clear why this is but it has a lot to do with the fact the Wrench doesn’t actually take 50% of the load [as one length of rope would in DdRT]. Again, experiment for the best results.
3. The industry has gone in the direction of a stitched eye being the best termination for a hitch cord. It’s quick, relatively low cost and keeps the stiff section above each eye as short as possible, thus allowing for the most compact hitch possible.
4. Without experimentation there wouldn’t be any innovation so please go ahead and try and come up with your own hitch. Just remember, practice with it low & slow before bombing out of the biggest tree you can find.

SOME TIPS & TRICKS
1 - BLAKE’S HITCH
Old school but still cool.

ADVANTAGES
It doesn’t make for a particularly sophisticated climbing system but it has one extremely redeeming feature that sets it apart form the majority of the other friction hitches out there. This is that it functions effectively on rope of the same diameter as the cord being used to tie the friction hitch. No climber should leave the ground without knowing it because in an emergency you may need to set up a “three knot system” and use it to descend out of the tree. Other uses include minimalist rigging where you want to incorporate progress capture into a system but you only have the rope used for tensioning. Don’t forget a stopper knot if you’re using it for PPE.
DISADVANTAGES
- Unresponsive & hard to tend when used as a climbing system.
- Causes wear onto rope surfaces that may not be designed to tolerate heat.
- Not suitable for all rope constructions [inflexible ones may not grab].
2 - VT [Valdotain Tresse]
Not quite so old school.
ADVANTAGES
For many climbers this was the first “advanced” friction hitch that they ever learnt. It combines reliable grabbing with relatively smooth opening into a sophisticated and still very relevant hitch. Once a decent amount of rope weight is underneath it it will generally self tend very well if the rope & hitch are clean.
DISADVANTAGES
- It can tend towards binding up if tied with 8 mm cord and not kept clean. It’s also [slightly] harder to learn than a prusik.
3 - XT
Nice & open.
ADVANTAGES
A slight variation on the VT, it tends to open up more easily but can fail to grab as reliably. I’ve been shown a few slight variations on how it’s tied but the important part is that one of the braids crosses over itself rather than around the rope [hence the “X”].
DISADVANTAGES
- It grabs less reliably than a VT & can create more sit-back if tied with the wrong length cord.
4 - Knut
Short & tight.

ADVANTAGES
This makes an excellent “compact” hitch ideal for lanyards & climbing systems where the climber wants to avoid sit-back. It also has a cool name.
DISADVANTAGES
- Because it’s short you have less distance between fully open and fully closed. This can give you less control for landing big swings with style if used in a climbing system. For a lanyard this isn’t a big deal.
5 - Cornell Hitch
Hardware free tending!

ADVANTAGES
This was first shown to me by Joseph Hawkins [Instagram @foregnarms] but invented by the eponymous Matt Cornell. This is one for the gear minimalists because it somehow manages to tend smoothly without any hardware aid whatsoever.
DISADVANTAGES
- In the same way as the Knut it may be a bit short to give you the control necessary for your main system.
6 - Helical Hitch
Looks weird but works.

ADVANTAGES
First shown to me by my manager at Asplundh in NZ [Aaron Clifton] who in turn was shown it by Drew Bristow - however that story gets told a little differently depending on who you ask. Check out Drew’s excellent instructions on how to tie this hitch and be sure to give him a follow on Instagram @dbtree. I’ve found this one to be an acquired taste: those that like it tend to LOVE it. It can be kept nice & short & the spare leg is often tied to the becket of a Pinto pulley. It self tends well and stays open reliably.
DISADVANTAGES
- Only one leg of the hitch is loaded [not an issue if the cord is fully intact] but if you nick your hitch cord then you are at a greater risk than if both legs were load bearing.
7 - Klemheist
Good for doubled rope.

ADVANTAGES
Most climbers’ experience of this hitch will be as a footlocking prusik for use in the [now redundant] footlocking event of climbing competitions. It grabs well on doubled rope and is easy to tie.
DISADVANTAGES
- Doesn’t tend to grab reliably on single lengths of rope.
8 - Distel
Good for lanyards.

ADVANTAGES
It’s fairly similar to the Knut in characteristics but which one is superior depends on who you ask. I’ve found you tend to need a lot of wraps to get it to grab reliably but this then gives you a lot of control for smooth adjustments when releasing under load.
DISADVANTAGES
- Not the best hitch for use as part of a main climbing system.
9 - Farrimond Friction Hitch
Adjustable quick release.

ADVANTAGES
So this one has a lot in common with a prusik but incorporates a “slip release” element into it. With this inclusion you can create a slight mechanical advantage system which can then be released with just one firm tug. It lends itself towards guyline restraint systems when rigging.
DISADVANTAGES
- NOT FOR LIFE SUPPORT!
10 - Purcell Prusik
Did you think I’d forgotten it?

ADVANTAGES
I hoped to avoid writing about something as mundane as the lowly prusik but what article about friction hitches would be complete without it? If you can’t tie a prusik then arguably you shouldn’t be working at height. I include a slight variation on the original in that it is tied around itself to form the “Purcell Prusik”. This may be more familiar to rock climbers & those working in Search & Rescue as it forms part of an emergency ascent/descent system.
DISADVANTAGES
It only makes for a rudimentary [but still very useful] ascent/descent system.


4 comments
I recently started using the Distel after 20 years of climbing with Blakes, VTs, and Schwabs. Distel is a super high-performing hitch – grabs well, releases like a dream, and is slack enough to allow room for the bulky ends of my homemade tails, w/DFL’s and Buntlines over thimbles. I can’t believe I took so long to try it. Also, that Purcell Prusik – I need a tutorial on how to tie that. My very first positioning lanyard back in 2003 had a “built-in” prusik like that. I untied it because I was curious to see if I could te-tie. I did but it took me a long time and I’m not sure how!!
Some quality content there bro, thanks for posting.
Been to long well over due for a catch up.
Cheers,
Will
No Michochan hitch?